The Contractor’s Guide to Roof Measurement Reports


If you’re still climbing roofs with a tape measure, you already know the drill: it’s risky, time-consuming, and usually a pain in the a**. Whether you’re bidding jobs, dealing with insurance claims, or ordering materials, your takeoff needs to be fast, clean, and correct. That’s where roof measurement reports come in.
In this guide, we’ll break down what a roof measurement report actually includes, how different methods compare, what they usually cost, and why BidEngine’s $9 option might be a game changer for your business.
Let’s get into it.
What Is a Roof Measurement Report?
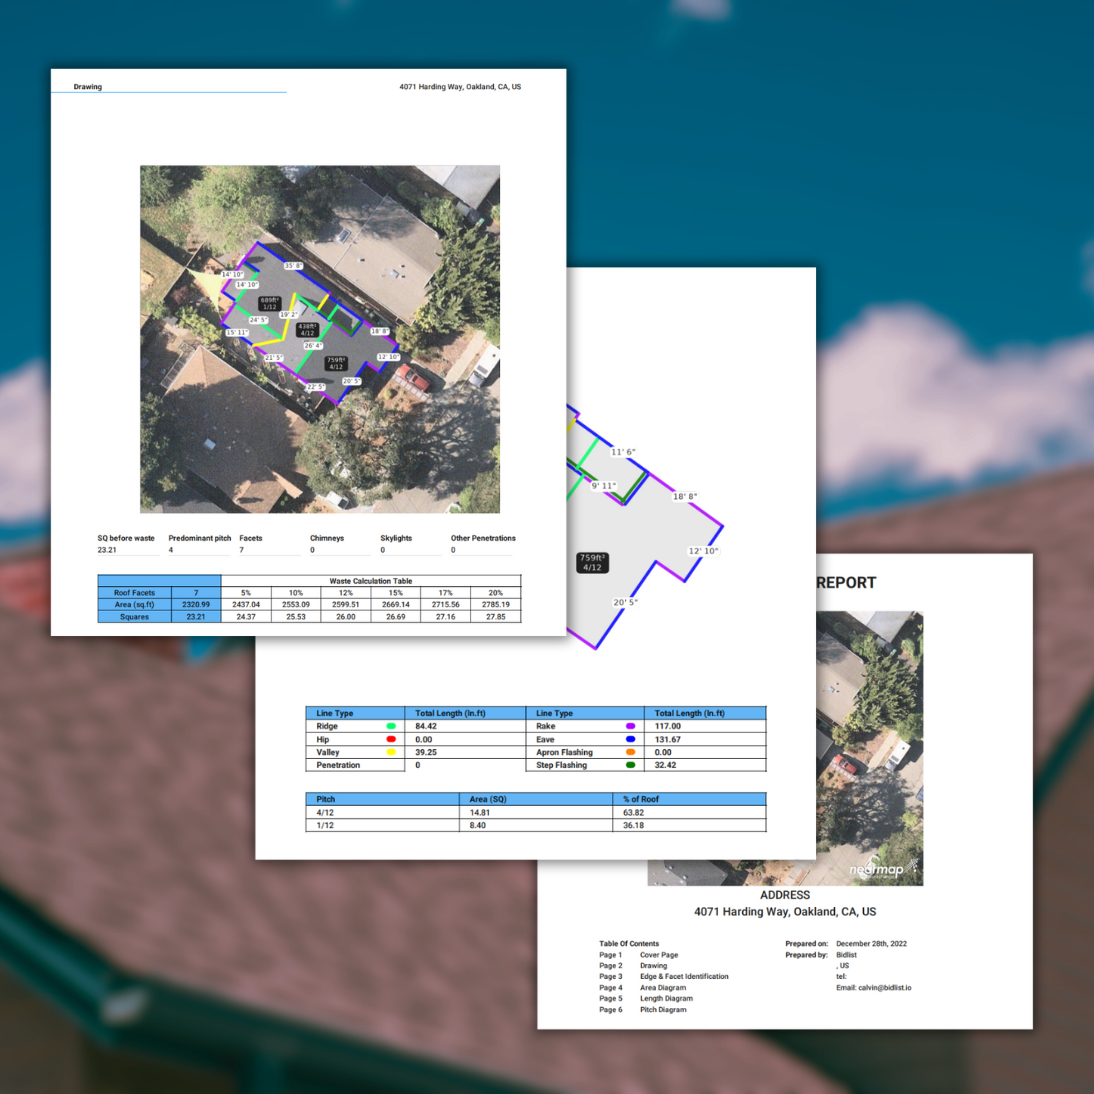
A roof measurement report is a digital breakdown of a roof’s geometry and dimensions. It's used to calculate areas, line lengths, pitch, and other essential data for accurate roofing takeoffs. These reports are designed to replace manual measuring with a faster, safer, and more consistent solution.
A typical report includes:
- Roof Planes: Each flat surface of the roof is identified, measured, and labeled. Reports list total square footage as well as the square footage of each individual plane.
- Pitch: This refers to the steepness or slope of the roof, usually expressed as a ratio (e.g., 6:12). Different slopes affect labor intensity, material types, and installation difficulty.
- Line Types: Roof measurement reports will often label various line types including:
- Ridges (where two planes meet at the top),
- Valleys (where two slopes meet inward),
- Eaves (lower edges of the roof),
- Hips, Rakes, and Step Flashing lines.
All of this data feeds into your roofing takeoff, which is your master material list and labor estimator for the job.
Manual vs. Satellite vs. Drone: What’s the Best Way to Measure a Roof?
You’ve got three main ways to get roof measurements: do it by hand, use drone capture, or rely on satellite imagery. Let’s break each one down.
Manual Measuring
This is the old-school way — ladder, tape, notebook. While it’s the cheapest method in terms of tools, it’s expensive in time and risk. It can be a big waste of time to drive out to a jobsite that you aren’t sure will even become a project. A measuring error on a steep roof or missing a section due to obstructions (think chimneys, tree limbs, or solar panels) can throw off your bid and hurt your margins. Plus, every time you or your crew climbs up, there’s safety liability.
Drone-Based Reports
Drones can be very accurate and provide high-resolution images, especially for complicated or multi-level roofs. But there are caveats: drone reports often cost more, require licensing, and can be restricted by FAA regulations in certain areas. If you're not flying the drone yourself, you’re probably paying $100 or more for a vendor to do it.
Aerial/Satellite-Based Reports
This is where online roof measurement tools come in. By using high-resolution aerial and satellite imagery, companies like BidEngine can generate full roof measurement reports from an address — no site visit needed. These reports are typically accurate enough for estimates, takeoffs, and even insurance claims. Best of all, they’re fast and scalable.
The Cost Breakdown: $30–$50 vs. BidEngine’s $9 Report
Roof measurement reports from big-name providers typically cost between $30 and $50, depending on the complexity and turnaround time. Some charge more for rush delivery or multi-structure properties. If you're quoting several jobs per week, those fees add up fast.
BidEngine offers the same core data — area, pitch, line lengths, plane dimensions — for just $9 per report, and the best part? It’s ready in about 20 minutes.
Let’s do some simple math.
- 10 bids a week x $40/report = $400/week
- 10 bids a week x $9/report = $90/week
That’s over $300 in savings every week, without compromising on the core data you need to quote confidently.
If you're spending more on reports than you're comfortable with or trying to manage everything manually to avoid the cost, it's time to rethink the process.
When Are Roof Reports Most Valuable?
A roof measurement report isn’t just a convenience. In many situations, it’s a business advantage. Here are four common use cases where roof reports make a big impact:
1. Bidding and Estimating Jobs
This is the bread and butter. Quick, accurate takeoffs allow you to turn around bids faster and win more jobs. When you can pull a measurement report in 20 minutes, you’re not waiting for a site visit or scrambling to do math late at night. You’re ready to quote on the spot — and that speed gives you an edge.
2. Insurance Claims and Storm Damage
Adjusters often use similar data, and having your own report can help verify measurements, especially after hail or wind events. You can use it to check adjuster estimates, justify your own numbers, or even push back on underreported damage.
3. Avoiding Rework and Material Shortages
Ordering too much material eats into profit. Ordering too little means delays. A precise roofing takeoff keeps your crew productive and your supply list tight. If you’ve ever had to pause a job waiting on an extra square of shingles or another roll of underlayment, you already know how costly that is.
4. Saving Time Across Your Team
Every hour your crew or sales team spends measuring is time not spent selling, installing, or closing jobs. Roof measurement reports streamline that work. You can even delegate it to your office staff — just input an address and get a PDF in minutes.
Tips for Getting the Most Accurate Roof Report
Even with satellite technology, the quality of your report depends on a few things. Here’s how to make sure your data is as accurate as possible:
1. Double-Check for Obstructions
Trees, shadows, and neighboring buildings can obscure parts of the roof in satellite images. If you know a tree is blocking part of the house, note it. Better yet, submit the address with a note or additional context, if your tool allows.
2. Confirm the Structure
Make sure you’re measuring the correct structure, especially on large lots or properties with detached garages, sheds, or multiple buildings. A good report should label each section, but it helps to verify.
3. Look at the Report Before You Bid
It sounds obvious, but don’t just download the report and plug in the numbers. Review the layout. Confirm the pitch makes sense. Look for anything weird or asymmetrical that might affect your crew on install day.
4. Use Reports as Part of a System
Roof measurement reports are best when integrated into your full bidding workflow. Pair them with estimating software, CRM tools, or your own spreadsheet templates. The goal is to remove guesswork and speed up your quoting process.
Why BidEngine Might Be the Smartest $9 You Spend All Week
Let’s recap. You’re a roofing contractor. You need fast, accurate data to win jobs and protect your profit. You can:
- Keep climbing roofs and risking missed details.
- Pay $40 per report with the big guys.
- Or, get the same essential data for $9 in about 20 minutes, without leaving your office.
BidEngine gives you roof measurement reports that include everything you need to build a solid takeoff — plane dimensions, pitch, linear footage, and line types — all from a satellite view of the property. It’s simple, fast, and built for contractors who don’t have time to waste.
Get Started Now
Ready to save time, bid smarter, and ditch the tape measure?
Submit your first address now — your $9 report will be ready in about 20 minutes.
No contracts. No gimmicks. Just the data you need to get the job done right.
Want to test it out? First 3 reports are free: https://reports.bidengine.app/